By my second year of remote work I had tried every trick in the book for the headaches that crept in around 3pm. Blue-light glasses. F.lux. A standing desk. Reducing screen brightness until my monitor looked like a candle stub. None of them solved it. The actual culprit was contrast, specifically the violent gap in brightness between my glowing screen and the dark wall behind it. Once I understood bias lighting and set it up correctly, the afternoon headaches dropped off inside two weeks. This guide covers every step of that process, including the one piece of gear that made the biggest difference for under forty dollars. The fix was bias lighting, and the tool I settled on was a Quntis monitor light bar. This guide walks through exactly how to set it up.
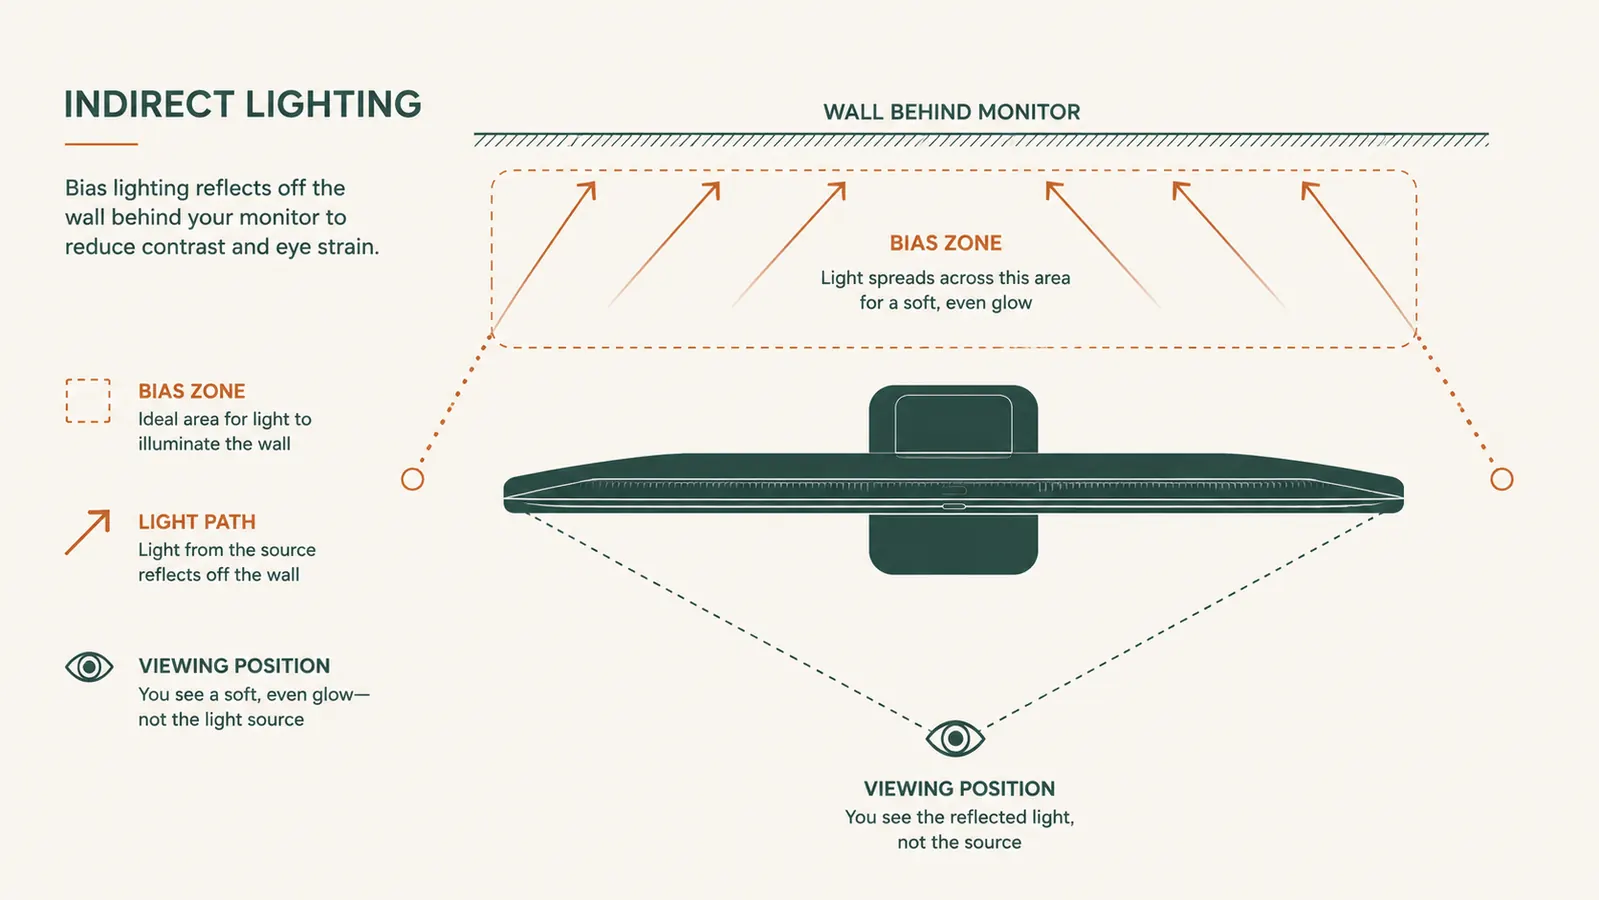
Bias lighting is not a gimmick. It is the practice of placing a low-level light source behind your monitor so the wall behind your screen is lit at roughly the same brightness level as the edges of your display. Your pupils then do not have to constantly dilate and contract as your gaze moves between the bright panel and the dark surround. Less muscular work for your eyes, less fatigue by end of day. The BBC and Hollywood colorists use the same principle for critical color grading work. It costs nothing in complexity and very little in money.
Stop ending the day with eyes that feel like sandpaper
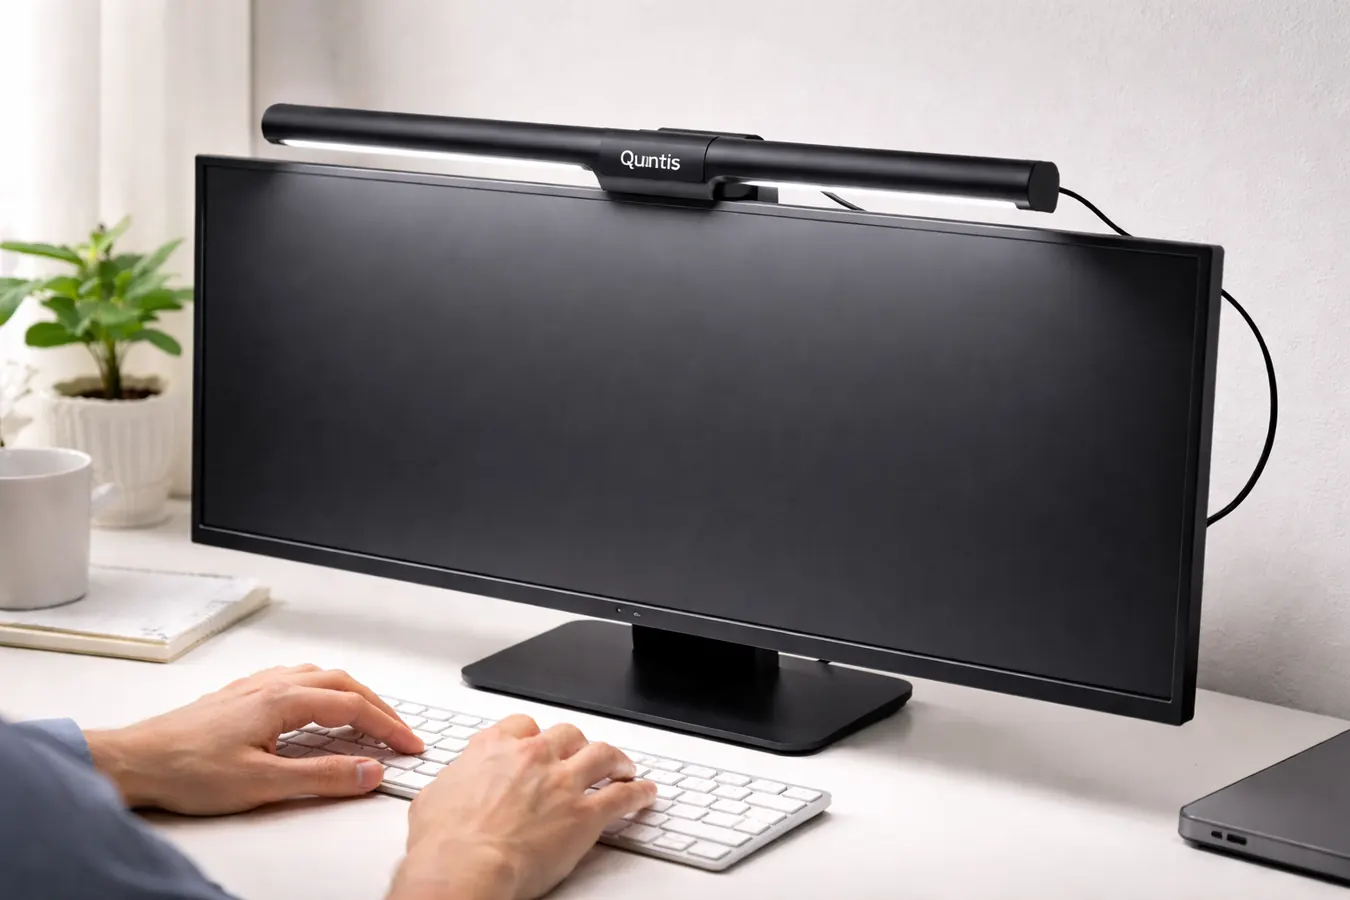
The Quntis monitor light bar mounts in two minutes, powers from a USB port, and throws zero glare on your screen. It is the starting point for the bias lighting setup this guide walks through. Over 13,500 home office workers have rated it 4.6 stars.
Amazon Check Today's Price on Amazon →Step 1: Understand What You Are Actually Trying to Fix
Before you buy anything, it helps to know what bias lighting is correcting at the physiology level. Your monitor has a peak brightness of around 200 to 400 nits. A completely dark room around your screen reads at roughly 0 nits. Your visual cortex is continuously trying to balance perception across that entire field of view. The result is a measurable increase in the speed at which your ciliary muscles fatigue, which is exactly the sensation you interpret as eye strain. Bias lighting raises the ambient luminance behind the screen to somewhere between 10 and 20 percent of your screen's peak brightness, which is the range vision researchers and the Society of Motion Picture and Television Engineers both recommend for comfortable extended viewing.
The color temperature of your bias light also matters. Human eyes are most comfortable when the ambient light closely matches the color temperature of the screen itself. Most monitors default to around 6500K (daylight) for document work, but many people drop them to 5000 to 5500K during the afternoon. Your bias light should sit in the same range, 4000 to 6500K, rather than the warm amber of a standard LED bulb at 2700K, which creates a color conflict your eyes have to reconcile constantly. This is the detail most budget LED strip guides get wrong, and it is the main reason some people try bias lighting and say it did not help.
Step 2: Choose and Position Your Light Source
You have two practical options for a home office. The first is an LED strip light affixed to the back of your monitor, throwing light onto the wall behind it. This works and can look clean if routed carefully, but strip lights require you to manage power bricks, color temperature settings, and adhesive that sometimes fails after a few months. The second option, and the one I recommend if you have not already committed to an LED strip setup, is a monitor-mounted light bar that solves two problems at once. A quality light bar provides the downward task lighting you need for your keyboard and desk surface and simultaneously bounces indirect light off the wall behind your monitor when positioned correctly.
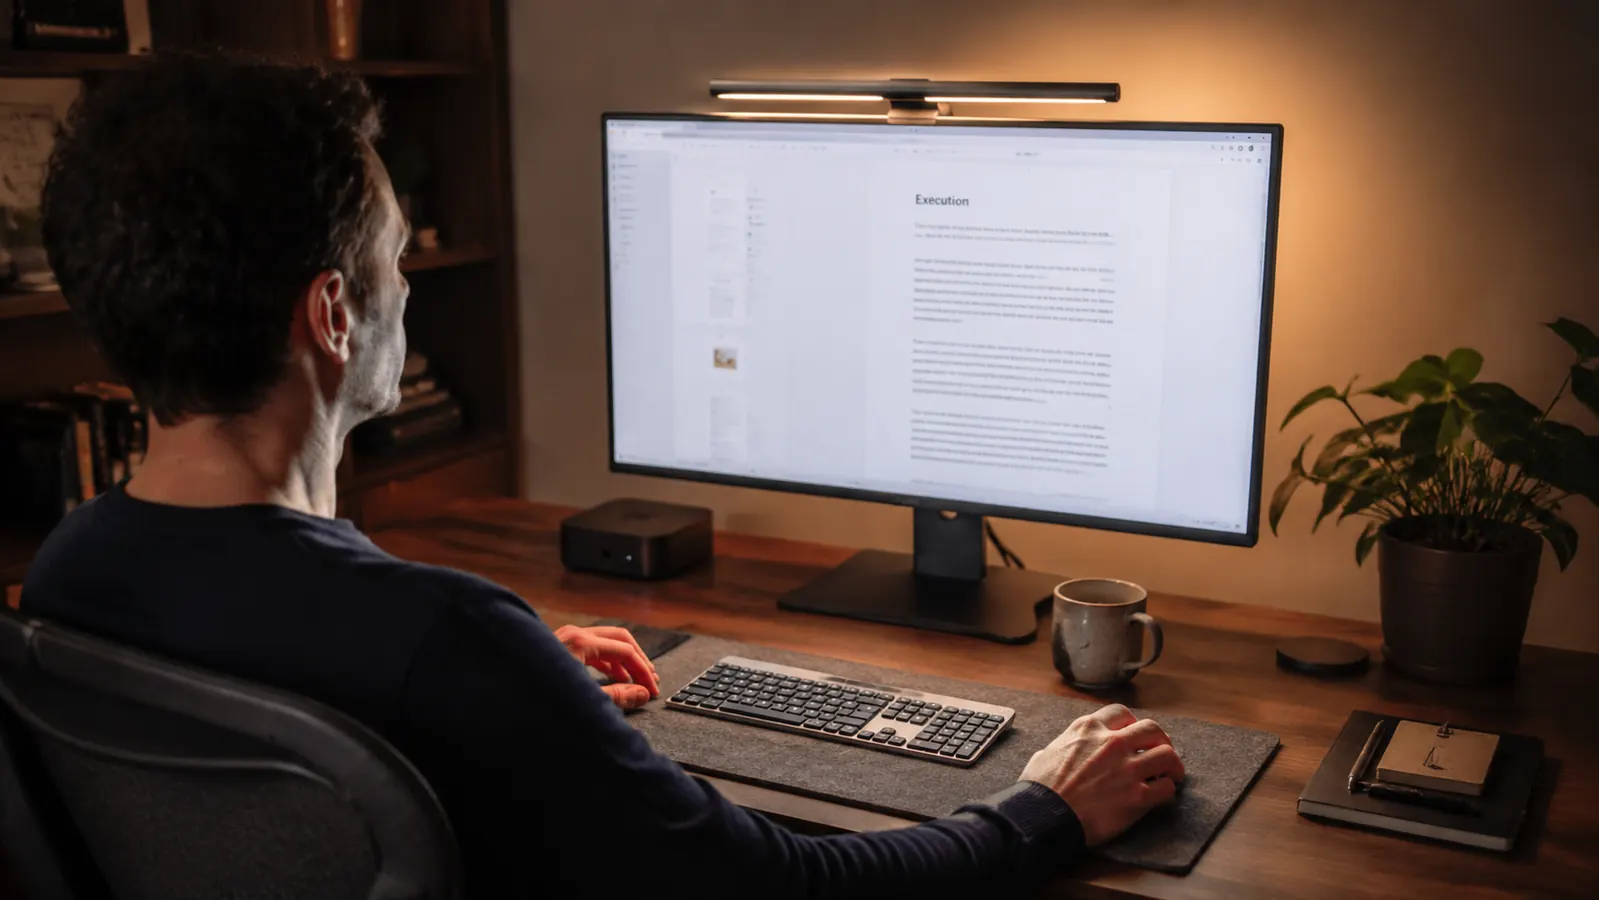
The Quntis Computer Monitor Lamp is designed specifically for this dual purpose. It clips onto the top edge of any flat-panel monitor between 1 and 3 centimeters thick, no adhesive required. The optical design angles the beam slightly forward and downward toward your work surface, which means no direct light reaches the screen face, which means no glare. The backward scatter from the wall provides the bias effect. I mounted mine in about ninety seconds using the weighted clip, ran the USB-A cable along the back of my monitor stand, and powered it from a USB port on my existing hub. Total cable added to my desk: zero visible.
If you already own LED strip lights and want to use them behind the monitor, place the strip horizontally across the top rear edge of the panel first. A second strip along the bottom rear edge adds symmetry and reduces the brightness gradient between top and bottom of the wall. Keep the strips pointed directly at the wall and away from any angle that could reflect into the screen.
Step 3: Dial In Brightness and Color Temperature
Once your light is mounted, the calibration step is the one most people skip. Open a mostly white document on your monitor. Set your monitor brightness to the level you actually work at, which for most remote workers is somewhere between 60 and 80 percent of maximum. Now look at the glow on the wall directly behind your monitor. You want that wall glow to be clearly visible but noticeably dimmer than the screen itself. A rough real-world test: if the wall behind your monitor looks completely black, your bias light is not bright enough or is not positioned to throw light backward. If the wall glow looks nearly as bright as your screen, you have gone too far and you will create a different problem where the ambient competes with the display instead of supporting it.
On the Quntis bar, brightness is controlled via the rotary touch wheel on the top of the unit. One tap turns it on or off. Rotating adjusts brightness continuously from 0 to 100 percent. A second tap toggles between warm (2700K), neutral (4000K), and cool (6500K) color temperatures. For daytime work I run mine at cool 6500K, which matches my monitor's default color profile. For work sessions that run past 6pm I drop to neutral 4000K on both the bar and my monitor's color settings simultaneously. Keeping the two in sync is the detail that separates comfortable from uncomfortable bias lighting setups.
If you are using generic LED strips rather than the Quntis bar, look for strips rated between 4000K and 6500K and use a dimmer to target roughly 15 to 20 percent of your screen brightness. Most smart LED strips marketed as bias lighting are set too bright out of the box.

Step 4: Fix the Rest of Your Room Lighting
Bias lighting behind your monitor works much better when the rest of your office lighting is also managed. The goal is even, low-contrast illumination throughout the room rather than one bright hotspot at your screen. Two practical fixes cover most setups. First, make sure your overhead light is on whenever your monitor is on. A dark room with one lit screen is the worst-case scenario. Even a cheap overhead bulb running at low wattage is better than complete darkness around the screen. Second, manage window light. Direct sunlight hitting your monitor face washes out the display and forces you to crank brightness in compensation, which then requires you to crank up your bias light, and the whole system gets pushed past comfortable levels. A simple set of light-filtering blinds or sheer curtains lets natural light into the room without creating a direct glare path to the screen.
If your desk is against a wall with no window nearby, you have the easiest setup situation. The only light source you need to actively manage is your monitor and its bias light. If your desk faces or sits beside a window, position your monitor so the window is to the side rather than directly behind or in front. Light from the side is easier for your eyes to handle than light from behind the screen (which creates silhouetting) or light from in front (which creates surface glare).
Bias lighting does not dim your screen. It raises the floor around it. That one shift takes your eyes from sprinting to jogging for eight hours straight.

Step 5: Build the Habit and Verify It Is Working
Setting up bias lighting once and forgetting about it is ninety percent of the battle, but a few habits will keep the benefit consistent. First, turn your bias light on before you turn your monitor on, not after. This ensures you are never sitting in a dark room in front of a bright screen even for a few minutes at the start of the day. A USB-powered light bar like the Quntis handles this automatically if you plug it into a USB port on the monitor itself, because the monitor's USB hub powers on with the display. Second, if you run two or more monitors, add a bias light to each one. The worst asymmetry in a home office is one lit screen and one dark screen sitting side by side.
You should notice a difference in eye fatigue within the first week. For me the tell was that I stopped reflexively lowering my monitor brightness around 2pm, which had been a signal I was already fighting the contrast glare. If you are still getting afternoon headaches after two weeks with the bias light set up correctly, the next variable to check is monitor height. Eyes positioned to look slightly downward at the screen (top of the monitor at or just below eye level) reduce the amount of unshielded light that reaches the bottom of your retina, which is another measurable driver of strain independent from contrast.
For further reading on lighting your screen setup, the full comparison between a monitor light bar and a traditional desk lamp is covered in the monitor light bar vs desk lamp guide, and if you want more detail on the Quntis bar specifically before buying, the long-term Quntis monitor light bar review covers a full year of daily use, including brightness measurements and whether the touch sensor degrades over time.
What Else Helps
Bias lighting is the highest-leverage change you can make for about forty dollars, but a few other no-cost adjustments compound the benefit. The 20-20-20 rule is legitimately useful: every twenty minutes, look at something twenty feet away for twenty seconds. This is not about resting your eyes from light, it is about releasing the focal tension in your ciliary muscles, which lock into near-focus position when you stare at a screen for extended periods. Set a timer if you cannot do it by feel.
Increase your monitor's text size rather than leaning toward the screen. Leaning forward closes the distance between your eyes and the monitor, which increases the apparent brightness and contrast your eyes receive and negates some of the bias lighting benefit. Most remote workers have their monitor too close at distances under 60 centimeters. The typical sweet spot is 60 to 80 centimeters from eye to screen, which is roughly arm's length for most adults. At that distance a 27-inch display at 1080p or higher resolution reads comfortably without squinting.
Finally, display calibration matters more than most guides admit. A monitor running out of the box at maximum contrast and a blue-heavy color profile is doing more damage than your lighting setup can compensate for. Most monitors have a built-in eye-care or reading mode that drops contrast and shifts the color profile slightly warmer. These settings are worth enabling as a baseline before you start adjusting brightness. They do not replace bias lighting, but they reduce the baseline load that bias lighting has to offset.
The Quntis bar is the fastest way to start: two-minute setup, USB power, zero desk clutter
It mounts on any monitor between 1 and 3cm thick, powers from a USB port you already have, and comes with three color temperature modes to match your screen throughout the day. Rated 4.6 stars by over 13,500 buyers. No separate power brick, no adhesive, no tools.
Amazon Check Today's Price on Amazon →